


Build Your First Blockchain App in 15 min with Sui & Typescript
(brand new or noob web dev edition)


For more brief and less fun version aimed at experienced devs, click here.
Ahh, blockchain. The word that strikes fear into the hearts of many a developer.
Let's be honest - almost none of us really know how the heck they work. Crypto this, node that, hash my address (daddy). What even ARE validators? Validate deez nuts!
Well, lucky for you and I, this ain't 2017 no more. The chains themselves may be as complicated as ever, but the tooling around them has matured dramatically. Let me show you how easy it is to build your first blockchain app on one of the newer and faster chains, Sui ('sweet', the t is silent).
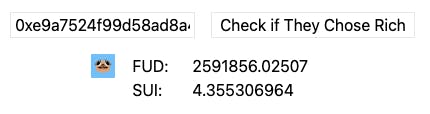
Our final app will show coin balances for any given wallet, like so:
The Setup
The plan is simple: build a website with HTMX and Typescript. No React. No Move. No Vite. Ugh, shudders. No, no. We like things simple. And cute.
Which is why we'll be using bunjs as our package manager. It will help you install other things. Why bun? JUST LOOK AT IT! OMGGGG, I just wanna squeeze it!
![]()
install bun (or bun-bun, as I call it)
(If you are on a Windows machine then, first, I'm sorry, and, second, you can instead install Node. Just replace 'bun create' w/ 'node create' and 'bun add' w/ 'node i'.)
Open your Terminal and run this command (do not, of course, type the $ symbol):
$ exec bash
to make sure we're using the bash shell (the best of all shells, ofc), and then run this:
$ curl -fsSL https://bun.sh/install | bash
After the install finishes, we could use 'bun create' command to get the project going BUT that command lacks... what's that you're saying, 'creativity'? Yes! I so agree.
Run this in your Terminal so we can use more fun commands instead:
$ echo -e '\nalias bake="bun create"\nalias prep="bun init"\nalias bun-bun="bun add"' >> ~/.bashrc
This lets us type "bake" instead of "bun create". Coz buns.. bake. lol
Ok type this to reload the config file so your terminal knows about the new aliases:
$ source ~/.bashrc
create the project
Point Terminal to the parent folder that will hold the project. If you already have one, navigate there using cd/ls commands, otherwise create one by running these two commands one after another:
$ mkdir Sui
$ cd Sui
Now you've created Sui directory and navigated to it. The line at the bottom of your Terminal window should look similar to this (except you'll have Sui instead of sui):

Erm, "Fuck-Putin" is just the name of my computer. So: [ComputerName]:[ActiveFolder] [username]$ is what you should be seeing.
Now let's tell bun-bun to create the project for us using template called "elysia". Elysia is the web server we'll be using and it has its own template by the same name. Creating from a template is entirely optional; it just saves us a few steps.
Run these 3 commands one after another (waiting for previous command to finish):
$ bake elysia sui-first-bun
$ cd sui-first-bun
$ bun-bun @elysiajs/html @mysten/sui.js
(if you are boring, replace 'bake' with 'bun create' and 'bun-bun' with 'bun add')
Woot! Bun baked us the project scaffolding and added the two dependencies needed: Elysia's html extension and Sui's JS library. We're ready to feast err code!
The Base
open the project
Open Visual Studio Code (or your editor of choice) and then File -> Open Folder..., select the Sui (or w/e name u picked) folder in your home user directory (on Macs, it's in Macintosh HD/Users/[username]), then sui-first-bun, and click Open. You should see this:
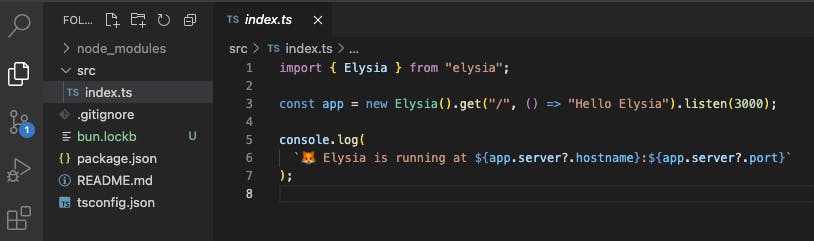
Let's make sure it runs. Go back to the terminal, make sure you're in the project's folder (sui-first-bun) and run command bun dev. You should see this output:

Now navigate to localhost:3000 in your browser and you should see "Hello Elysia" - that's the output from the web server you're now running on your machine!
If you're wondering what bun dev does, go back to VS Code and open package.json in project's root folder (CMD+B or CTRL+B to show/hide the primary sidebar, then the tab with two files as icon). You'll see a line under "scripts" that reads "dev": "bun run --watch src/index.ts". You can add own line, if you'd like, such as "debug": "bun --inspect --watch src/index.tsx". This is great for when you want to step through your typescript files with a debugger line-by-line, and it will run if you type bun debug in terminal when in the project's root folder. But I digress...
configure
A few final things to enable us to intermix HTML and TypeScript code without the compiler giving us issues.
rename index.ts file to index.tsx (in VS Code, just press Enter when focus is on the file name). Update the name also on line 6 of package.json file.
open tsconfig.json and add these 3 lines under compilerOptions, like so:
  "compilerOptions": {
      "jsx": "react",
      "jsxFactory": "Html.createElement",
      "jsxFragmentFactory": "Html.Fragment",
back in index.tsx, at the top add these 2 lines:
  import { html } from "@elysiajs/html";
  import * as Sui from "@mysten/sui.js/client";
finally, add
.use(html())to Elysia server declaration and maybe format it as so:const app = new Elysia() .use(html()) .get("/", () => "Hello Elysia") .listen(3000);
If you saved all files, you should see "🦊 Elysia is running at..." message still at the bottom of your terminal (try bun dev command again otherwise).
serve main page to user
Time to replace "Hello Elysia" with some real HTML. I.e., a textbox where user can input a wallet address and a button that kicks things off.
Click on index.tsx in the primary sidebar (CMD+B) and then the New File.. icon at the top of the sidebar, name this file BaseHTML.tsx. Inside, paste this code:
export default function BaseHTML() {
  return (
    <html lang="en">
      <head>
      <script
      src="https://unpkg.com/htmx.org@1.9.10"
      integrity="sha384-D1Kt99CQMDuVetoL1lrYwg5t+9QdHe7NLX/SoJYkXDFfX37iInKRy5xLSi8nO7UC"
      crossorigin="anonymous"></script>
      <script src="https://cdn.tailwindcss.com"></script>
      <title>My First Sui-t Bun</title>
      </head>
      <body>
        <div class="flex justify-center p-4">
          <form hx-post="/coins" hx-target="#results">
            <input name="address" type="text" class="border pl-1 pr-1"></input>
            <button type="submit" class="ml-4 border pl-2 pr-2">Check if Chose Rich</button>
          </form>
        </div>
        <div id="results" class="flex justify-center"></div>
      </body>
    </html>
  )
}
What's it do? The first <script> tag imports HTMX javascript library, the second - Tailwind CSS (my personal choice for styling pages). Then we have a simple form with a text field and a button next to it. The button will send contents of the textfield to the server, and then take whatever html the server returns and insert it into the results div. The most important line, of course, is the text between <title> tags b/c, let's face it, it's a damn good pun 😊.
If you haven't used HTMX before, the cape-wearing heroes here are the two keywords hx-post and hx-target. The first one sends the form to a /coins address on the web server, and the latter tells htmx to paste w/e comes back from the server into a div with id 'results'. Pretty simple, and simple is good.
To show this glorious new html code to users, in index.tsx replace the line .get("/", () => "Hello Elysia") with:
.get("/", () => BaseHTML())
Also add this import line at the top so that index.tsx knows where to look for BaseHTML function:
import BaseHTML from "./BaseHTML";
With the files saved, refresh browser page and you should see:

Of course, if you paste a wallet address and click the button, nothing will happen because the web server is not yet setup to receive anything at /coins route, much less to return anything useful back. (Though if you check Developer Tools -> Console, you'll see an error logged where the client calls /coins on the server and gets back a 404 error (not found), as it should.)
Now pour yourself a glass b/c you're more than halfway through this and we're finally-totally-not-kidding-this-time ready to use Sui javascript wrapper to read data off of the blockchain. My. God. Jesus. Buddha. Almighty. It's about time.
The Meat
First we must tell Elysia what she must do when someone tries to go to /coins. Insert the following line in-between .get and .listen lines:
.post("/coins", ({ body }) => balances(body))
Now our code should look like so:
const app = new Elysia()
  .use(html())
  .get("/", () => BaseHTML())
  .post("/coins", ({ body }) => balances(body))
  .listen(3000);
body is a special keyword used with Elysia to represent the data received from the client. We're telling the web server to "plz pass the body (the contents) of the POST to our function, balances. Thank you." (Never forget to say 'thank you' even when talking to a program. Especially when talking to a program. Ahem hi AI ahem.)
You'll notice that "balances" is underlined b/c we haven't yet defined that function. Let's do that. At the bottom of index.tsx, add:
function balances(body: any) {
  const addy = body.address;

  if (!addy || addy === "") {
    return <div>Plz enter wallet addy above</div>;
  }

  return (
    <div class="grid grid-cols-[50px_60px_150px] text-middle">
      <div class="col-span-3">{addy}</div>
    </div>
  );
}
First, we expect an address field on the body object. If no such field, we return back HTML that tells the user to enter an address. Otherwise, we for now return HTML that just displays the entered address, as confirmation of us receiving it.
Ok, real talk for mega-real now: it's time to actually use the Sui JS wrapper to access the blockchain.
Right above the function balances(...) line, insert this line:
const client = new Sui.SuiClient({ url: Sui.getFullnodeUrl("mainnet") });
And then back inside balances() function, after the if that checks if address was provided, let's read the blockchain!
const coins = await client.getAllBalances({ owner: addy });
You'll see that "await" is now underlined.
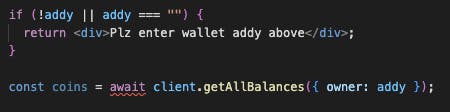
This is because our balances() function wasn't marked as asynchronous, and all Sui functions are defined as Promises, i.e. operate asynchronously. This means that our enclosing function must be such also.
Fix this by adding async in front of function balances:
async function balances(body: any) {
Now let's take care of the scenario where the wallet has no coins. After const coins = ... add:
  if (!coins || coins.length === 0) {
    return <div>No coins in this wallet. They didn't choose rich.</div>;
  }
If we do get coin balances back, we should include them in the HTML returned back to the client. Replace <div class="col-span-3">{addy}</div> with this:
{coins.map(c => <><div class="col-span-2">{c.coinType}</div><div>{c.totalBalance}</div></>)}
Note the empty <> and </> tags. This is an artifact of the library we're using that only allows the return html to be wrapped in one parent tag. The empty tag is used when we don't want to use another tag, such as div. It allows the code to work but in reality it's just ignored and has no impact on final html your web server returns to the client.
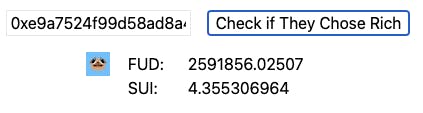
If you've followed correctly and refresh the page and provide a wallet address, you may see something as beautifully ugly as this:

It's b/c we're getting 'rugged' by the getAllBalances() function we're calling. It doesn't return back metadata for each coin, such as the symbol ($SUI, etc.) or how many decimal places the coin is using. So, for SUI, we're actually seeing the MIST balance, not SUI balance. I.e., my wallet (seen here) has 4.35 SUI, not 4 billion SUI. Unfortunately 😅. And that long number in front of ::fud::FUD? It's basically the address of the contract that deployed the coin.
(The balance of FUD coin is hidden behind the address b/c, listen, I ain't no css expert, okay, I'm just a guy next door trying to write a blog.)
Ugly or not, the key thing here is that you've just read data from a blockchain!!! WOOT! Smash a shot or two of tequila both in celebration and to deal with the depressing realization that I did, in fact, lie to you about the whole 15 minutes thing and I may not be the friend you thought I was.
The Final Code
Since getAllBalances() rugs us, we need to make another call for each coin we get back to get that coin's metadata - its symbol, url to icon/image (if any), etc.
There are many ways to skin this fox; here I picked a fast and dirty one.
Let's first define a type that encapsulates the information we want to send back to the client. Insert this code outside the body of function balances(), such as right above the const client = ... line:
type coin_balance = {
  symbol: string,
  url?: string | null,
  balance: string
}
Now back inside the balances() function, right above the final return statement, add this code:
let coin_balances: coin_balance[] = []
for (let coin of coins) {
  const meta = await client.getCoinMetadata({ coinType: coin.coinType });

  if (!meta) {
    coin_balances.push({ symbol: coin.coinType, url: undefined, balance: coin.totalBalance });
  } else {
    const balance = Number(coin.totalBalance) / Math.pow(10, meta.decimals);
    coin_balances.push({ symbol: meta.symbol, url: meta.iconUrl, balance: String(balance)});
  }
}
For each coin returned from getAllBalances() function, we try to get its metadata. If we do not get that (i.e., !meta), then we create a coin_balance object populated with the ugly data we do have. Otherwise, we populate it with the pretty data we get from getCoinMetadata() function. By dividing the totalBalance by 10 to the power of decimals value we get from the metadata, we get the real coin amount (as far as I understand). I.e., my 4 billion SUI balance becomes the more realistic 4.35 SUI.
Now we need to display this data. Replace the {coins.map...} line inside the return statement with this:
{coin_balances.map(coin_row)}
And finally, add the coin_row() function below the balances() function:
function coin_row(cb: coin_balance) {
  const img = cb.url ? <img src={cb.url} class="ml-2 w-6 h-6"></img> : <></>;
  return <><div>{img}</div><div>{cb.symbol}:</div> <div>{cb.balance}</div></>;
}
This last function simply takes the coin_balance view model (a term for such objects) and creates HTML for a row with 3 columns: image, symbol, and balance. And if there's no url in the data provided, it returns empty tags in place of the image, the tags we discussed before.
Save, go back to your browser and refresh, enter a wallet address, and vuala:
I'm up 5% on that dog coin today! Which is... checks notes... $0.08. NICE! 😭
And that's a wrap! You can try some Sui wallets from top 100 list to see what coins they hold.
Thank you for reading my first blog about Sui!
Bun-bun and Elysia wave you goodbye 🥟🦊👋🏼
Follow me on X if you're weird.
If you'd like to double-check the code, your final index.tsx should look like this. You can also download the source code from github.
import { Elysia } from "elysia";
import { html } from "@elysiajs/html";
import * as Sui from "@mysten/sui.js/client";
import BaseHTML from "./BaseHTML";

const app = new Elysia()
  .use(html())
  .get("/", () => BaseHTML())
  .post("/coins", ({ body }) => balances(body))
  .listen(3000);

console.log(
  `🦊 Elysia is running at ${app.server?.hostname}:${app.server?.port}`
);

type coin_balance = {
  symbol: string,
  url?: string | null,
  balance: string
}

const client = new Sui.SuiClient({ url: Sui.getFullnodeUrl("mainnet") });

async function balances(body: any) {
  const addy = body.address;

  if (!addy || addy === "") {
    return <div>Plz enter wallet addy above</div>;
  }

  const coins = await client.getAllBalances({ owner: addy });

  if (!coins || coins.length === 0) {
    return <div>No coins in this wallet. They didn't choose rich.</div>;
  }

  let coin_balances: coin_balance[] = []
  for (let coin of coins) {
    const meta = await client.getCoinMetadata({ coinType: coin.coinType });

    if (!meta) {
      coin_balances.push({ symbol: coin.coinType, url: undefined, balance: coin.totalBalance });
    } else {
      const balance = Number(coin.totalBalance) / Math.pow(10, meta.decimals);
      coin_balances.push({ symbol: meta.symbol, url: meta.iconUrl, balance: String(balance)});
    }
  }

  return (
    <div class="grid grid-cols-[50px_60px_150px] text-middle">
      {coin_balances.map(coin_row)}
    </div>
  );
}

function coin_row(cb: coin_balance) {
  const img = cb.url ? <img src={cb.url} class="ml-2 w-6 h-6"></img> : <></>;
  return <><div>{img}</div><div>{cb.symbol}:</div> <div>{cb.balance}</div></>;
}